A ‘QR’ (short for Quick Response) code is a so-called ‘two-dimensional barcode’ made up from black squares on a white background. QR Codes are usually contains URLs, Text or something like ID of Product, the QR Code technology is widely use in Android and Blackberry mobile phone, if you are Blackberry or Android user i think you must be familliar with this. The image bellow is some example of QR Code.
The QR Codes
There are many resources which can help you to generate a QR Code, in Ubuntu you can use application called 'qrencode', the qrencode could help you to generate your own QR Code complete with what size do you like (Large, Medium, or Small), a manual how to use a qrencode can completely find in here. Anoher way, you can visit this website (http://qrcode.kaywa.com/) to generate your own QR Code.
This article will discuss how to read a QR Code in Ubuntu, to read a QR Code in ubuntu we need library (program) named libdecodeqr-simpletest - libdecodeqr library's simple test program, this sample program can recognize the image file of the QR code of JIS X 0510 and ISO/IEC18004. Before we start, you should Install libdecodeqr-examples using apt-get or Synaptics Package Manager.
apt-get install libdecodeqr-examples
libdecodeqr-simpletest is command based application program which is accessible through ubuntu terminal, all command and output of this application is displayed through the screen of terminal, use libdecodeqr-simpletest by using structure above :
libdecodeqr-simpletest <the path of QR Code image>
For more detail see the example bellow (you must have QR Codes to be testing if you don't have any please download here) :
libdecodeqr-simpletest /home/white/qrcode.png
the line command above is illustrated of 'reading the QR Code on the image of qrcode.png', the command above will give output on the terminal like this :
Who do not know a Skype, the software which usually help people to make a calls over the Internet using computer. Skype uses decentralized peer-to-peer technologies, so your calls do not go through a central server but through distributed servers and other users. It uses its own proprietary communication protocol to achieve this. How to install skype on Ubuntu 10.10 is quite simple, follow this guide bellow to install skype on Ubuntu 10.10.
First you need to add Ubuntu 10.10 skype repository to your Aptitude, add following line to your source.list (/etc/apt/source.list) then save.
deb http://download.skype.com/linux/repos/debian/ stable non-free
For the second step, you need to install PGP key, paste and execute the command bellow to your terminal.
Firefox 4 (stable) has launched, this superb web browser come with the tagline "Made to Make the web a better Place" propose three major advantages that is Personalize, Go Fast, and Stay Safe. Especially for ubuntu user, you can install Firefox 4 by downloading the installation packagehere, or you can install it using apt-get or synaptics package manager. If you have decide to install Firefox 4 via apt-get or synaptics you can following 3 step to install Firefox 4 via apt-get or Synaptic on ubuntu bellow.
First, before you start the installation, add the Firefox 4 Ubuntu PPA Repository to your /etc/apt/source.list. If you have dificulty to find that file, just copy and paste the command bellow to your terminal.
Second, update your package repository info by this command.
sudo apt-get update
For the last, install the Firefox 4 through apt-get using the command line bellow, or using Synaptics Package Manager by search key : "Firefox 4".
sudo apt-get install firefox ubufox
Firefox has always good, Ineverfeltdisappointed while using this web browser, to get more information and screenshoot about the new Mozilla Firefox 4 you can visit the official website here.
"Are you pidgin user ?", we have a tips for you ...
There is a security issue regarding passwords storing in pidgin, you should have to think back when using automatic login through "remember password" on this application. Why? Because pidgin will store your account password in plain text it's mean that pidgin save your password in clear text without any encryption. If you are using ubuntu or other distro the account settings stored in /home/<user>/.purple/accounts.xml. and for windows user the file will strored in C:\Documents and Settings\user\Application Data\.purple\accounts.xml.
Pidgin save password screenshoot
If you enable remember password, you will find tags <password> in that file (accounts.xml) then followed by your account password. And yes, "naked" just like that..
Pidgin password stored in accounts.xml
There's still vulnerabilities regarding passwords storing in pidgin, our suggestion is don't activate automatic login using "remember password" while using pidgin, cause you have been stripped..
Draftsight is Professionals 2D CAD application which run in Linux (Ubuntu, Fedora, openSUSE) or other OpenSource software platform. As we know, we never had software (in Linux) which can Create, Open and View AutoCAD (*.dwg) before, but try this, this is an answer for engginering who appreciate of using OpenSource software or run all kind of Linux Operating system in their desktop. DraftSight professionals 2D CAD released beta version for linux lovers around the world as an alternative of AutoCAD. With this application we can also allows to create, open, and view *.dwg files. that produced by Autodesk the software company.
Draftsight running on Ubuntu
Try DraftSight professionals 2D CAD for Ubuntu by download the package from link bellow :
Draftsight for 64-bit users : The beta version of DraftSight is provided in 32-bit Operating System. To get DraftSight run on 64-bit Operating System (Ubuntu and all kind of linux) you need to install following missing library:
if you have installed all required libraries above, install the draftsight deb package through the terminal using 'force architecture' option, copy and paste the command above to install draftsight for 64-Bit Operating System :
Hi there, today we (ubuntubuzz) wanna share an excellent premium theme for your wordpress blog. This theme is specifically made by ubuntubuzz team which modified from default wordpress theme 'jenny'. This Green, Simple and Elegant Theme is suitableforyour blog which usually using a clean and simple themes view, This themes named 'Green theme' which is taken from our favorite color Green, here'sthe screenshot from the demo page.
Green wordpress themes
The Green Theme has a lot of option provided, you can customize and add some social information there, thus template properties provided :
Customable Widget in the left and bottom of page.
Dynamic featured image slider.
Featured video dan popular post (*controlable by theme option on the admin page).
Google adsense ready, you can embed adsense advertisment on the top and bottom of the post.
Easy to Insert google analytics code.
Social network and bookmarking sharing botton in the bottom of the post.
etc
The picture above illustrated 'the Green Theme' theme option on the admin page, you can find easily this page at the time you finish the installation.
Green wordpress themes admin
Finally you can test by your self, give us feedback so that we can provide a better wordpress template another day.
Perhaps many of Gamers wondered in their thought, "if we migrate to ubuntu, can we play popular games like we used to play before ?", for that question above I can answer clearly that Anything can do with Ubuntu Now days, this article will give another solution for playing popular Game at Ubuntu. The gamers used to play various game in different way, platform and operating system but in this article we just discuss how play a game console in ubuntu using application/system called emulator, a video game console emulator is a program that allows a computer or modern console (cross-console emulation) to emulate a different video game console's behavior. We have known that Ubuntu has a lot of video game emulator, in this article I just pick up top 5 Greatest Ubuntu Game Console Emulator you should know.
PCSX for Sony Playstation 1 (PS 1)
PCSX is Ubuntu Game Console Emulator for Sony Playstation 1 (PS1). If you are Sony PlayStation 1 (PS1) game fans, but you do not have the console, this is a solution for Playing Sony Playstation 1 (PS1) at Ubuntu. How to install PCSX in ubuntu is quiet simple, type the command bellow in your terminal then you have PCSX installed in your mechines
sudo apt-get install pcsx
PCSX2 for Sony Playstation 2 (PS2)
PCSX2 is Ubuntu Game Console Emulator for Sony Playstation 2 (PS2), PCSX2 available in both Microsoft Windows and Linux operating systems. In its latest stable release, many PS2 games are playable, and several games have full functionality. The main bottleneck in PS2 emulation is emulating the multi-core PS2 on a PC x86 architecture. Although each CPU can be emulated well, accurately synchronizing the cores is very difficult. How to use and install PCSX2 in ubuntu is quiet simple, download the libraryherethen running the PS2 game by using image.
The visualboyadvance (VBA) for Game Boy Advance
VisualBoyAdvance (VBA) is an Ubuntu Game Console Emulator for Nintendo’s Game Boy, Color and Advance, handheld game consoles. VBA now has versions for Windows, Linux and Mac.
How to install visualboyadvance in ubuntu is quiet simple, type the command bellow in your terminal, then you will have visualboyadvance installed in your Ubuntu.
sudo apt-get install visualboyadvance
Desmume for Nintendo DS (NDS)
Desmume is Ubuntu Game Console Emulator for Nintendo DS (NDS), DeSmuME is a new Nintendo DS emulator by YopYop. Emulates pretty well Meteos's demo but there is a small problem with the mouse. It is called DeSmuME which we guess comes from merging DS EMU and ME. Emulator is progressing very fast and many commercial NDS roms can be booted on it (http://www.ndsemulator.com/nintendo-ds/desmume.htm), Other Great Nintedo DS Emulator is nocash GBA, but we should have wine installed to run it, becauseGBA is not available in both Ubuntu and other Linux distros.
Desmume Nintendo DS screenshot
How to run or install Desmume in ubuntu is quiet simple (just like before :P), download the library here http://www.desmume.com/download.htm or by typing command bellow, then you will get desmume installed in your Ubuntu.
sudo apt-get install desmume
The Guide bellow is show us how to install and run Desmume on Ubuntu Desktop, the video bellow is taken from youtube by this link.
How to install and Play Nintendo DS using Desmume on Ubuntu Desktop
ZSNES for Super Nintendo
ZSNES is a Super Nintendo emulator ZSNES project was GPL'ed and its source released to the public. It currently runs on Windows, Linux, FreeBSD, and DOS. Remember that this is a public beta so don't expect this to run on your machine. How to install Zsnes in ubuntu is quiet simple an cheap, just type the command bellow in your terminal then you get znes installed in your ubuntu.
sudo apt-get install zsnes
Yes here the end of the article 5 Greatest Ubuntu Game Console Emulator, Another solution for Playing Popular Game at Ubuntu, hopefully this article would be useful for ubuntu gamers, happy holiday ....
Sometimes an IT Administrator need to work anytime and averywhere to manage or control computer devices or servers that exist by remote desktop sharing. Especially if there are disturbances and the position we're not at the office, while the device is experiencing problems can only be accessed by the office's internal network only, it required a VPN (Virtual Private Network) so that we can get into the office's internal network via a network connection from anywhere, VPN is Another Solution for Linux Administrator.
VPN solutions are now widely available, either provided by your ISP or a software. In tis article i want to review ubuntu remote desktop sharing using by software called "TeamViewer", Teamviewer is work using VPN Connection and can be use cross platform or cross operating system. Teamviewer software is available for windows and linux, to install Teamviewer in ubuntu you can visit their official website and download it here: http://www.teamviewer.com/download/index.aspx. This software is free as long as not used for commercial purposes. TeamViewer also provides a paid version of the course with more features than the free version. Teamviewer works by creating a pear-to-pear between 2 pieces of host or client, Install Teamviewer on the computer within the internal network that we want the remote, then other computer that will perform remote must have internet connection and off course Teamviewer ready. look following exampletoperform ubuntu remote desktop sharing using Teamviewer VPN. I'm using Linux Ubuntu 10.10 and I am going to a remote target is a PC with Windows OS. How to install Teamviewer in ubuntu is just type command above in the terminal:
$ Sudo-i teamviewer_linux.deb dkpg
Once completed in our live install just run from the menu in Ubuntu: Application - Internet - TeamViewer
Teamviewer screenshot
Each TeamViewer will have a unique fixed ID for every 1 computer. and will also generate a password each time you run the software. Well next, make the TeamViewer remote ID on your computer that will be remote. Live input only opponent ID and password then click "connect to a partner"
Teamviewer remote desktop sharing
In terms of security this software is somewhat vulnerable because of its simplicity to use. If we do not want to allow this software running on the internal network, maybe you can block the port and its domain from the side of the firewall. Yep .. That is Another Solution for Linux Administrator who want to perform remote desktop sharing using VPN, i hope this will help .. :D
0
comments
Hi there..Since a long time not uptodate. Here we are to bring technical guide "How to make your Linux Gnome (Ubuntu) desktop look like a Mac, this guide is for Ubuntu addict with obsessed with the theme of Mac OSX esspecially the Leopard. Previously we know themes like Mac4Lin, and now we can use this themes (GEKOS Leopard Theme for Nautilus Elementary) to make our desktop look like a MacOS Leopard closely, out of my personal opinion, this themes is great than Mac4lin it self. GEKOS Leopard Theme for Nautilus Elementary can be downloaded from this link: http://gekos.no/themes/gtk.html, From the screenshot attached, I think this theme is the closest to the actual theme of Mac OSX.
gekos showing image file screenshot
gekos desktop screenshot
And this is GEKOS Leopard Theme for Nautilus Elementary User Review Video i grab from youtube.
Yes enough for today, i hope my tutorial would make you pround of you linux (ubuntu) desktop now, for full review and screenshoot you can follow this link.
Is it possible Nexian Journey went smoothly using the Android 2.2 Froyo. The answer is a smooth victory, perhaps in wonder why the local product is smooth jaya using Android 2.2 I, personally maybe because the hardware support that qualified so Froyo can run smoothly.
Nexian Journey
Features the latest in a human face on android Froyo enjoy using this local product without significant obstacles, one of the interesting features is the support for busybox, this feature can be used to run the operating system in one Froyo android operating system can run is ubuntu desktop.
Quadrant test results even addressing a significant increase from the version that just got eclairs 460 points, and using Froyo get test results Quadran 960 points. screenshot is below. But I felt lack of use Android 2.2 on Nexian Journey Battery endurance is a problem of wasteful use Eclair berberda with the rather more efficient use of power in the battery. Having some way to brain tweaking green robot Nexian Journey in ubuntu, now turn to upgrade the system Android 1.3 Android 2.2 Froyo Eclair to using Ubuntu. Munkin upgadrade method Froyo on Nexian journey has been much discussed on blogs devoted to mengoprek Nexian Journey using the window-based applications but this time I will mebahas bahaimana how to upgrade using the Ubuntu operating system. Upgrde Nexian Journey to Froyo using 2 ways fastboot Mode and Stand Alone Mode (Installation using the sdcard), so to fastboot mode can use in my previous writings that discuss using fastboot Mode using Ubuntu. Step by step that must filled is to prepare some important files to upgrade to Froyo. The following files are required in the downloaded file :
There is Step by Step to Upgrade Nexian Journey to Android Froyo
The first step download the file to the end and make sure nothing is corrupted
Then make sure Nexian Journey detected fine on Ubuntu systems, how to install the driver you can find easily by uncle google.. :D
After installation is complete drivers continued to use the method fastboot.
Turn off your mobile phones, then go in fastboot Mode by pressing the [Hang up (red button)] + [Volume Down] + [Power] simultaneously.
After entering the mode fastboot proceed, enter recovery Clockwork Froyo into the recovery partition as follows:
Move Recovery Clockwork.img into one directory or folder contained fastboot file that you saved. eg in your home directory, your Ubuntu Open Terminal and then type the following command in fastboot modes:
When you have finished entering clockwork.img into Android partition then restart the fastboot mode by typing the command:
. / fastboot reboot
Then the phone will go in Normal Mode Android (Android is still in the previous version), in this mode ROM Froyo proceed to copy files and Google Apps.zip CynogemMod.zip into sdcard directory (copy the file in the directory / sdcard not in another directory)
After the file copy process is complete turn off your cell phone, and off batrey to menggilangkan cache files are left behind.
Replace the batrey and turn the phone and then enter the Recovery Mode by pressing the [Power] + [Volume Down] + [Camera] simultaneously, recovery mode menu will look like the following picture:
Android Recovery Mode
Use the volume up / down to select the menu and press the trackball to choose the selected menu.
Step hereinafter select the Choose Zip From the menu and then select the file sdcard-1.6.2-ROM CynogenMod update.zip proceed to choose the menu to install, wait until the installation is finished CynogenMod ROM (installation not more than 8 minutes depending on the speed of the R / W sdcard)
After installation is complete CynogenMod ROM, repeat the steps above to to install GooogleApps.zip
Wait until the installation is complete GoogleApps, then go back into recovery mode main menu, select menu wipe data / factory reset to format the data in internal memory
Wipe process is completed and then restart your phone by selecting menu reboot the system now
Mobile will be the live re-wait some time to appear spalsh CynogenMod logo. process takes 5 minutes
Wait until the entry of Android Normal mode, that meaning the upgrade to the Android 2.2 Froyo is complete.
Ubuntu Tweak is an application to config Ubuntu easier for everyone. It provides many useful desktop and system options that the default desktop environment doesn't provide. With its help, you will enjoy with the experience of Ubuntu. Ubuntu Tweak popped out a new release one stuffed full with some great new features. It is a bug-fix version coming with a lot of PPAs update.Initial support has been adeded for Ubuntu 11.04 Alpha, including Compiz settings pre-Natty users will be familiar with (E.g. Workspace Edge Settings, Desktop Effects and Menu Effects.)
Enable workspace switching using mouse scroll wheel. We’ve covered five ways to switch between workspaces in Ubuntu a few months back. Now we’ll have to make that six ways to switch now that Ubuntu Tweak has added a single-click solution to enabling “Workspace switching with mouse wheel”. Once enabled click on a blank part of the desktop and scroll up or down to roll on to the the left next workspace.
MeMenu tweak Fed up of seeing your ‘username’ in the MeMenu? Help is at hand in this release; a new option, Me Menu Setting, gives the ability to swap between real name, user name or no-name at all in the MeMenu area. Helpful helper is helpful Lastly is the addition of a ‘system error’ helper that, rather than bleating on that something is amiss, actually offers up assistance in fixing the problem.
Ubuntu tweak 0.5.8 can be downloaded in this link.
Warning: During installation, there is an advanced option (Ready to install -> Advanced) to install the GRUB2 bootloader into the same partition into which the (K)Ubuntu OS is installed but not to change the MBR (Master Boot Record). Pay careful attention during this step if your system uses a boot partition, uses multiple OS (more than 2), or chainloads bootloaders. For systems with such a boot partition, it is best not to overwrite the MBR.
* Example, from the Desktop version GUI installer, a point in the installation will be reached:
Summary -> Advanced -> Device for boot loader installation: /dev/sda6
Mac Os on Ubuntu
In this example, this setting will cause the GRUB2 bootloader to be installed into /dev/sda6 only (the partition into which the new (K)Ubuntu OS is being installed). The MBR (Master Boot Record) will not be changed. However, if the default setting of /dev/sda is allowed, then GRUB2 will not only be installed into partition dev/sda6 (into which the (K)Ubuntu OS is installed) but also the MBR (MasterBootRecord) will be changed so that the copy of GRUB2 stored there will be designated as the master bootloader for all Operating Systems on the entire computer. This may be undesirable if you wish to use bootloaders other than GRUB2.
If you want to install more than 2 operating systems on a single computer, check out these tips. Use Startup Manager to change Grub settings Grub is the bootup utility that controls which OS to load by default and other bootup settings. You can change Grub settings from the Startup Manager:
System -> Administration -> Startup Manager
If Startup Manager is not installed, install it:
sudo apt-get install startupmanager
Note: You can also edit the Grub settings manually from the command-line interface.
Dual-Booting Mac OS X and Ubuntu Mac OS X has a similar structure to Linux (it is BSD Unix based). Dual-booting Mac OS X and Ubuntu detailed instructions can be found here.
Installing Mac OS X after Ubuntu if you decide to dual boot with OS X, choose ext2 as your partition type during the Ubuntu installation. (For this the Super Grub Disk CD is a useful utility. You can download the Super Grub .iso image file at forjamari.linex.org and burn the image to a CD-ROM.)
* Once you have installed Ubuntu, edit the Grub start-up list:
sudo nano /boot/grub/menu.lst
and add the following lines:
title Mac OS X root (hd0,0) makeactive chainloader +1
Reboot your Mac and go to the terminal in Max OS X (if you have any issues booting, boot from your Mac OS X DVD). Press F8 and enter -s. Enter:
fdisk -e /dev/rdisk0 flag 2 <--note that flag 2 is my Mac partition number two quit y reboot
If are still unsure whether it is working correctly, use the Super Grub Disk CD and make grub active. Installing Ubuntu after Mac OS X If you get an error message during boot such as HFS+error in the bootloader, you can also use the Super Grub Disk for recovering Linux GRUB and the Windows MBR (Master Boot Record).
* Once you have installed Ubuntu, edit the Grub start-up list:
sudo nano /boot/grub/menu.lst
and add the following lines:
title Mac OS X root (hd0,0) makeactive chainloader +1
If you have issues with Mac OSX or Windows in GRUB, try changing the Mac OS X Grub entry
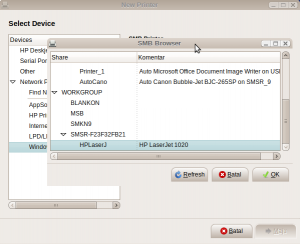
Whatever operating system (O/S) had installed, one of important jobs they must can do is "work every where, work any where", in this part we will stress our topic with how to let our printer use by other (sharing) via CUPS (Common Unix Printing System). The Common Unix Printing System, allows a computer to act as a print server. A computer running CUPS is a host that can accept print jobs from client computers, process them, and send them to the appropriate printer. For Example we will use Printer HP Laser Jet 1020 as object:
Go to System> Administration> Printing Printing after a window pops up then click Servers> New> Printers and follow the picture below
Step 1
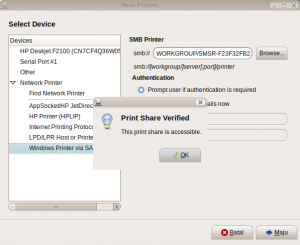
Choose Windows Printer via SAMBA, then click the Browse button then it will continue the process of scanning ... select the printer that has be shared and then click OK.To ensure click the Verify button and make sure the dialog box Print Share Verified exit. Then click Forward
Step 2
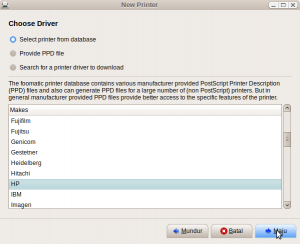
Select a vendor for printers that have been sharing and click Forward
Step 3
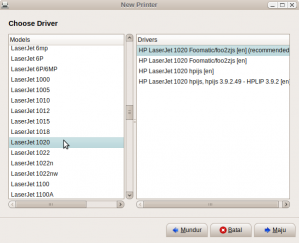
Selecting brands of printers ...
Step 4
Give a identification to the new printer…
Step 5
The installation process successfully. Will do a test print? Yes to print, not to reject ...
Step 6
It's all procedure we must do to share printer via CUPS on Ubuntu 10.04, It's quite similar to do this jobs in most distriburion like Ubuntu, blankon, Mandriva, OpenSuse. Good luck ..