Fast and easy Tutorial, Step by step Upgrade Nexian Journey to Android 2.2 (Froyo) on Ubuntu Desktop

9:03 AM

Is it possible Nexian Journey went smoothly using the Android 2.2 Froyo. The answer is a smooth victory, perhaps in wonder why the local product is smooth jaya using Android 2.2 I, personally maybe because the hardware support that qualified so Froyo can run smoothly. 
Nexian Journey
Features the latest in a human face on android Froyo enjoy using this local product without significant obstacles, one of the interesting features is the support for busybox, this feature can be used to run the operating system in one Froyo android operating system can run is ubuntu desktop.
Quadrant test results even addressing a significant increase from the version that just got eclairs 460 points, and using Froyo get test results Quadran 960 points. screenshot is below. But I felt lack of use Android 2.2 on Nexian Journey Battery endurance is a problem of wasteful use Eclair berberda with the rather more efficient use of power in the battery. Having some way to brain tweaking green robot Nexian Journey in ubuntu, now turn to upgrade the system Android 1.3 Android 2.2 Froyo Eclair to using Ubuntu. Munkin upgadrade method Froyo on Nexian journey has been much discussed on blogs devoted to mengoprek Nexian Journey using the window-based applications but this time I will mebahas bahaimana how to upgrade using the Ubuntu operating system. Upgrde Nexian Journey to Froyo using 2 ways fastboot Mode and Stand Alone Mode (Installation using the sdcard), so to fastboot mode can use in my previous writings that discuss using fastboot Mode using Ubuntu. Step by step that must filled is to prepare some important files to upgrade to Froyo. The following files are required in the downloaded file :
  1. File recovery Froyo: Recovery Clockwork.img
  2. File Application Google: GoogleApps.zip
  3. ROM Froyo CynogenMod 1.6.2: CynogenMod-1.6.2-stable-version
There is Step by Step to Upgrade Nexian Journey to Android Froyo

  • The first step download the file to the end and make sure nothing is corrupted
  • Then make sure Nexian Journey detected fine on Ubuntu systems, how to install the driver you can find easily by uncle google.. :D
  • After installation is complete drivers continued to use the method fastboot.
  • Turn off your mobile phones, then go in fastboot Mode by pressing the [Hang up (red button)] + [Volume Down] + [Power] simultaneously.
  • After entering the mode fastboot proceed, enter recovery Clockwork Froyo into the recovery partition as follows:
  • Move Recovery Clockwork.img into one directory or folder contained fastboot file that you saved. eg in your home directory, your Ubuntu Open Terminal and then type the following command in fastboot modes:
. / fastboot flash recovery recovery-Clockwork-z71.img
  • When you have finished entering clockwork.img into Android partition then restart the fastboot mode by typing the command:
. / fastboot reboot
  • Then the phone will go in Normal Mode Android (Android is still in the previous version), in this mode ROM Froyo proceed to copy files and Google Apps.zip CynogemMod.zip into sdcard directory (copy the file in the directory / sdcard not in another directory)
  • After the file copy process is complete turn off your cell phone, and off batrey to menggilangkan cache files are left behind.
  • Replace the batrey and turn the phone and then enter the Recovery Mode by pressing the [Power] + [Volume Down] + [Camera] simultaneously, recovery mode menu will look like the following picture:
    Android Recovery Mode
  • Use the volume up / down to select the menu and press the trackball to choose the selected menu.
  • Step hereinafter select the Choose Zip From the menu and then select the file sdcard-1.6.2-ROM CynogenMod update.zip proceed to choose the menu to install, wait until the installation is finished CynogenMod ROM (installation not more than 8 minutes depending on the speed of the R / W sdcard)
  • After installation is complete CynogenMod ROM, repeat the steps above to to install GooogleApps.zip
  • Wait until the installation is complete GoogleApps, then go back into recovery mode main menu, select menu wipe data / factory reset to format the data in internal memory
  • Wipe process is completed and then restart your phone by selecting menu reboot the system now
  • Mobile will be the live re-wait some time to appear spalsh CynogenMod logo. process takes 5 minutes
  • Wait until the entry of Android Normal mode, that meaning the upgrade to the Android 2.2 Froyo is complete.

0 comments

» read more....

Latest Ubuntu Tweak 0.5.8 Features and Review on Ubuntu 10.10

5:37 PM

Ubuntu Tweak is an application to config Ubuntu easier for everyone. It provides many useful desktop and system options that the default desktop environment doesn't provide. With its help, you will enjoy with the experience of Ubuntu. Ubuntu Tweak popped out a new release one stuffed full with some great new features. It is a bug-fix version coming with a lot of PPAs update.Initial support has been adeded for Ubuntu 11.04 Alpha, including Compiz settings pre-Natty users will be familiar with (E.g. Workspace Edge Settings, Desktop Effects and Menu Effects.) 

Enable workspace switching using mouse scroll wheel.
We’ve covered five ways to switch between workspaces in Ubuntu a few months back. Now we’ll have to make that six ways to switch now that Ubuntu Tweak has added a single-click solution to enabling “Workspace switching with mouse wheel”. Once enabled click on a blank part of the desktop and scroll up or down to roll on to the the left next workspace.

MeMenu tweak
Fed up of seeing your ‘username’ in the MeMenu? Help is at hand in this release; a new option, Me Menu Setting, gives the ability to swap between real name, user name or no-name at all in the MeMenu area.
Helpful helper is helpful
Lastly is the addition of a ‘system error’ helper that, rather than bleating on that something is amiss, actually offers up assistance in fixing the problem.


Ubuntu tweak 0.5.8 can be downloaded in this link.

0 comments

» read more....

Dual-Booting Mac OS X and Ubuntu, Installing Mac Os and Ubuntu on a single computer

12:04 PM

Warning: During installation, there is an advanced option (Ready to install -> Advanced) to install the GRUB2 bootloader into the same partition into which the (K)Ubuntu OS is installed but not to change the MBR (Master Boot Record). Pay careful attention during this step if your system uses a boot partition, uses multiple OS (more than 2), or chainloads bootloaders. For systems with such a boot partition, it is best not to overwrite the MBR.

 
* Example, from the Desktop version GUI installer, a point in the installation will be reached: 
        Summary -> Advanced -> Device for boot loader installation: /dev/sda6
Mac Os on Ubuntu
In this example, this setting will cause the GRUB2 bootloader to be installed into /dev/sda6 only (the partition into which the new (K)Ubuntu OS is being installed). The MBR (Master Boot Record) will not be changed. However, if the default setting of /dev/sda is allowed, then GRUB2 will not only be installed into partition dev/sda6 (into which the (K)Ubuntu OS is installed) but also the MBR (MasterBootRecord) will be changed so that the copy of GRUB2 stored there will be designated as the master bootloader for all Operating Systems on the entire computer. This may be undesirable if you wish to use bootloaders other than GRUB2.

If you want to install more than 2 operating systems on a single computer, check out these tips.

Use Startup Manager to change Grub settings
Grub is the bootup utility that controls which OS to load by default and other bootup settings. You can change Grub settings from the Startup Manager:

System -> Administration -> Startup Manager

If Startup Manager is not installed, install it:
sudo apt-get install startupmanager

Note: You can also edit the Grub settings manually from the command-line interface.
   
Dual-Booting Mac OS X and Ubuntu
Mac OS X has a similar structure to Linux (it is BSD Unix based). Dual-booting Mac OS X and Ubuntu detailed instructions can be found here.

Installing Mac OS X after Ubuntu
if you decide to dual boot with OS X, choose ext2 as your partition type during the Ubuntu installation. (For this the Super Grub Disk CD is a useful utility. You can download the Super Grub .iso image file at forjamari.linex.org and burn the image to a CD-ROM.) 
 
* Once you have installed Ubuntu, edit the Grub start-up list:
sudo nano /boot/grub/menu.lst
    and add the following lines:
title Mac OS X
root (hd0,0)
makeactive
chainloader +1

Reboot your Mac and go to the terminal in Max OS X (if you have any issues booting, boot from your Mac OS X DVD). Press F8 and enter -s. Enter:
fdisk -e /dev/rdisk0
flag 2 <--note that flag 2 is my Mac partition number two
quit
y
reboot
If are still unsure whether it is working correctly, use the Super Grub Disk CD and make grub active. 
 
Installing Ubuntu after Mac OS X
If you get an error message during boot such as HFS+error in the bootloader, you can also use the Super Grub Disk for recovering Linux GRUB and the Windows MBR (Master Boot Record). 
 

    * Once you have installed Ubuntu, edit the Grub start-up list:
sudo nano /boot/grub/menu.lst
    and add the following lines:
title Mac OS X
root (hd0,0)
makeactive
chainloader +1

    If you have issues with Mac OSX or Windows in GRUB, try changing the Mac OS X Grub entry
    change root (hd0,0) to root (hd0,1)

This means you will boot into partition number 1. You can try any partition number until you get it right.  

Article taken from : http://ubuntuguide.org/wiki/Ubuntu:Maverick#Dual-Booting_Mac_OS_X_and_Ubuntu 

0 comments

» read more....

Step by Step sharing printer via CUPS on Ubuntu 10.04

9:42 AM


Whatever operating system (O/S) had installed, one of important jobs they must can do is "work every where, work any where", in this part we will stress our topic with how to let our printer use by other (sharing) via CUPS (Common Unix Printing System). The Common Unix Printing System, allows a computer to act as a print server. A computer running CUPS is a host that can accept print jobs from client computers, process them, and send them to the appropriate printer. For Example we will use Printer HP Laser Jet 1020 as object:
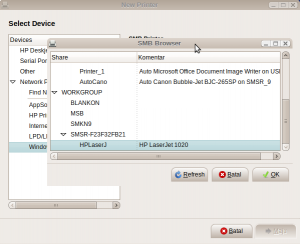
Go to System> Administration> Printing Printing after a window pops up then click Servers> New> Printers and follow the picture below
Step 1
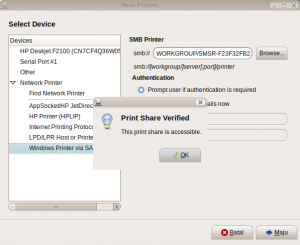
  • Choose Windows Printer via SAMBA, then click the Browse button then it will continue the process of scanning ... select the printer that has be shared and then click OK. To ensure click the Verify button and make sure the dialog box Print Share Verified exit. Then click Forward

Step 2
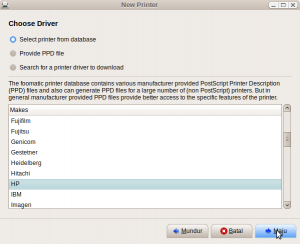
  • Select a vendor for printers that have been sharing and click Forward
Step 3
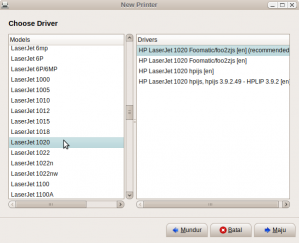
  • Selecting brands of printers ...
Step 4
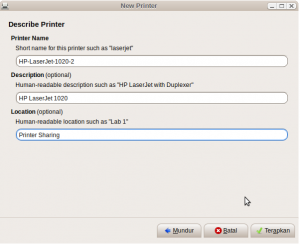
  • Give a identification to the new printer…
Step 5
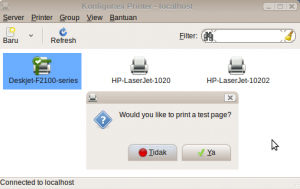
  • The installation process successfully. Will do a test print? Yes to print, not to reject ...
Step 6
It's all procedure we must do to share printer via CUPS on Ubuntu 10.04, It's quite similar to do this jobs in most distriburion like Ubuntu, blankon, Mandriva, OpenSuse. Good luck ..

0 comments

» read more....

OOChemistry OpenOffice Extensions, A Simply way to insert chemical notation/formula in your worksheet

8:32 AM


As if didn't want to miss with Microsoft Office Progress, OpenOffice.Org in providing services to the program office, especially that related to the chemistry it also provides its own specificity for the chemical. Understand it different chemical typing with regular typing. Often necessary chemical formulas and others.
To install (to install) OOChemistry, you must already
have installed OpenOffice.org in your operating system (Windows, Linux, Solaris, * BSD) also Java 1.6 runtime (Sun JRE 6 and OpenJDK 6 on x86 and x86_64 platforms.) Java must be activated in OpenOffice.org. If you encounter an error (error) during installation (installation), you may need to install/re-install OpenOffice.org-java-common or similar. How to install could be simply double click the file OOChem-0.1.0-alpha.oxt, if it get fails you can add it manually by this instructions:
On openoffice org click the Tools menu -> Extension Manager -> Select the Add button (at the bottom) -> Select the downloaded file OOChem-0.1.0-alpha.oxt -> Follow the next instructions until complete.

Adding OOChemistry by manual
To make a chemical structure on the document, select the menu item Insert -> Object -> OLE Object ... and select JChemPaint Chemical diagram. JChemPaint window will appear. Create an image that you want and close the window JChemPaint - images are stored (inserted - insert) in the document. To edit a chart or structure, double click on that structure.
Palet JChemPaint while usage
Some chemical formula is already in a worksheet
Download here OOo Chemistry 5.66 MB.Download OpenOffice.org 3.2.1 for Windows version here amounted to 148 MB.Download OpenOffice.org 3.2.1 versions for other operating systems can more visit http://kambing.ui.edu.Download Java Runtime 1.6.0.21 from here around 15.32 MB customize the operating system you use.
Source: Chemistry OOo from sourceforge.net.

0 comments

» read more....

Bricscad an Autocad For Linux (Ubuntu 10.04)

9:38 AM

To all lInux (ubuntu) user who almost waiting for a powerfull CAD application builder for linux, here they are the most powerfull CAD application running on both windows and linux from Bricsys named Bricscad. From the official website : "Bricscad™ is the powerful DWG-alternative CAD platform that enables DWG-based applications to serve the growing markets of GIS, AEC, mechanical CAD, and civil engineering". Bricsys products are available in 15 languages, with more languages in development.


Bricscad is the powerful DWG-alternative CAD platform that enables DWG-based applications and offers a complete and recognizable feature set to professional users. Here are 10 reasons why to choose Bricscad.
  1. You can modernize your CAD for 1/5 the price of AutoCAD.
  2. Bricscad offers full-function 2D/3D DWG-based CAD and a compelling technology roadmap.
  3. Bricscad comes with friendly upgrade policies.
  4. The people behind Bricscad are CAD veterans committed to world-class support.
  5. Most users are transitioning from AutoCAD to Bricscad in one week or less.
  6. Bricscad has over 100,000 users around the world and earned a 98% satisfaction rating.
  7. Users and administrators in organizations with both Bricscad and AutoCAD prefer Bricscad.
  8. Bricscad offers an AutoCAD-compatible programming platform that supports existing applications.
  9. Increasingly, top developers are offering their existing AutoCAD applications and add-ons on Bricscad.
  10. You can try it right now for free!
If you are Autocad user this application could be alternative application that support your work, there are several function that bricscad is more applicable than Autocad. Check this ..
Comparison betwen Bricscad and Autocad
Erik De Keyser, CEO of Bricsys, comments:
We consider Bricscad V10 for Linux as a milestone for our company. Despite doubts of many about the viability of a native Linux based professional CAD product, we are convinced that there is a strong demand for it and a huge potential for applications.
Bricsys is the right company to play a leading role in this evolution.

Download
A fully-functional 30 day trial period of Bricscad is available for Fedora, OpenSuse and Ubuntu 9.10 or above.
License keys can be purchased for around £365.00.

0 comments

» read more....

MintMenu on Ubuntu 10.04 (Lucid Lynx)

1:23 PM


Having read so many article about how to use Linux Mint Main Menu (MintMenu) on ubuntu then try it (* Eventually i feel satisfied), I was interesed to re-write same article to you, there are a lot of way to install mintmenu on ubuntu 10.04 some website suggest to use separate install through dpkg and other website recomend aptitude. Since a have tried all suggestions this is 6 simple, fast, and easy step to implemented when you  try to install MintMenu on Ubuntu 10.04 (Lucid Lynx).
1. Add linux mint repository to your source.list
sudo add-apt-repository ppa:webupd8team/mintmenu
2. Update your database package
sudo apt-get update
3. Install the Mintmenu
sudo apt-get install mintmenu
4. Point your cursor in the empty space in gnome panel, right click and choose "add to panel".
5. Add mintmenu to your panel
6. Arrange the panel with your favour.
if you have successfuly implemented 6 Step above, your ubuntu menu should be like this !!

Ubuntu with Mintmenu
If your menu same as mine you have successfully implement MintMenu on Ubuntu 10.04 (Lucid Lynx).

0 comments

» read more....

Apturl, a simply way to install ubuntu application or software package through a web browser

9:33 PM


Ubuntu GNU/LINUX never stop making improvement to their system, in this article I want to give little explaination how could we install ubuntu application/package through a web browser and how it's work. We have known that many way to install application or psoftware package on Ubuntu GNU/Linux, we have Synaptics, Ubuntu Software Center, Tasksel, and also traditional way using apt-get/dpkg on the terminal.
The APT protocol, or apturl, is a very simple way to install a software package from a web browser, through apturl user can install software package by clicking the link just like web address. For example, from a web page, when a Ubuntu user clicks on the link apt:packageexample , the apturl protocol will launch the package manager to propose the installation of the package called "packageexample" from the repositories available on the computer. Apturl is having dependencies with repositories available on the computer, you can add/edit ropositories address in /etc/apt/source.list.

There is little setting before we can use in our browser, if you are using firefox (Tested in firefox version 3.0 above) you can add firefox setting by following instruction below :
  • Enter about:config in the URL bar, right click the add following syntax.
     network.protocol-handler.app.apt in character chain with /usr/bin/apturl as value,
     network.protocol-handler.app.apt+http in character chain with /usr/bin/apturl as value,
     network.protocol-handler.warn-external.apt in boolean value and put true as value,
     network.protocol-handler.warn-external.apt+http in boolean value and put true as value.
  • Close and restart Firefox.
How to create Apturl link ?
If you have understand how to use apturl as a client, now we start to learn how to make Apturl link so you can build a web based synaptic package manager or ubuntu software package provider. Making apturl link is not much different from url link or mailto link, to make apturl link the HTML url must be write like this :

Single package
The basic syntax for an apt link is the following:
         click
Where package is the package you'd like the user to install.

Multiple packages
To bundle several packages into one link, the syntax is the following:
      click
Where package1, package2 and package3 are the packages you'd like the user to install.
For example:
      apturl apt:pidgin,pidgin-plugin-pack
Installs Pidgin and Pidgin Plugin Pack (if the user confirms).

Using AptUrl right after adding a repository
After adding a repository line via the Software Sources tool, the user has an option to reload the package list now or close the window, without reloading. This can be an issue if the user wants to install a package via AptUrl right after - because the newly added repositories haven't been scanned, and thus the program will not be found. To avoid such a situation, a "refresh" flag is available - if it's present, apturl will do a refresh first and then look for the program.
Sample link: Get Pidgin

0 comments

» read more....

Mozilla Chrome Urls, Secret Syntax to open Mozilla Firefox Hidden Function via URL bar

10:04 AM


Mozilla Firefox always give a surprise, not only about it's improvement,themes or plugin from the official website but sometime hidding some mysterious fuction which make us curious. Firefox’s interface is cleverly designed using JavaScript and XUL, and using what’s referred to as chrome URL’s you can actually open specific windows in a tab or the sidebar. This includes things like the management windows for bookmarks, saved passwords, downloads, extensions, and more. I almost use this browser more than 7 year, but lately when I was browsing the internet, i found important tips that show us how to open some hidden function in mozilla (an actualy i didn't know this before) via address bar. Here some Mozilla Chrome Urls syntax that mentioned above, all function type in mozilla firefox address bar.

chrome://browser/content/aboutDialog.xul
note : Use to open mozilla about page.

chrome://browser/content/metaData.xul
note : Use to show explanation of mozilla content

chrome://browser/content/openLocation.xul
note : Use to open web page that saved in your computer.


chrome://browser/content/history/history-panel.xul
note: Use to show browsing history panel.

chrome://browser/content/migration/migration.xul
note: Use to import firefox setting (Bookmark, History, cookies and password, etc) from other browser.

chrome://browser/content/preferences/colors.xul
note : Use to manage content colors.

chrome://browser/content/preferences/connection.xul
note : Use to manage a proxy setting

chrome://browser/content/preferences/cookies.xul
note: Use to show all cookies that saved by mozilla in your computer.

chrome://browser/content/preferences/languages.xul
note : Use to manage mozilla language.

chrome://browser/content/preferences/permissions.xul
note : This is my favorite function, this function is use to un/block a website.

chrome://browser/content/preferences/sanitize.xul
note : Use to erase all browsing history (in a one session)

chrome://browser/content/browser.xul
note : Use to open mozilla inside mozilla it self.

chrome://global/content/alerts/alert.xul
note : Use to minimize mozilla (unique content), to stop this action pres Ctrl()+W.

chrome://global/content/console.xul
note : Use to open javascript console.

chrome://mozapps/content/extensions/extensions.xul?type=extensions
note : Use to manage extension/add-on

chrome://global/content/filepicker.xul
note : Use to open new window like file picker in linux.

Thats all folks, i hope tips (Secret Syntax to open Mozilla Firefox Hidden Function) above will makin' easy your internet activity.

0 comments

» read more....

Adding Adium Fancy theme to you Empathy IM on Ubuntu

10:37 AM

Yes.. finally i write some article. In this 2nd week of August we will discus about how to add Adium fancy theme to your Empathy IM on Ubuntu. Adium is such Instant Messaging Client running on Mac Operating System, Adium IM has so many theme can be implemented which create by it's fan, and the exiting news is "all of that theme can be implemented in your Empathy IM". Before you start using any theme, better for you if you to search suitable theme in this forum. 
Empathy is Instant Messaging running on linux based operating system, Empathy IM has default folder place in /usr/share/adium/message-styles/ which adium themes should be placed. to start using your desire theme all you can do is :
  1. Download the theme
  2. Extract the file you have download.
  3. Copy *.AdiumMessageStyle/ into /usr/share/adium/message-styles/
  4. Open your empathy, and do to Edit > Preferences > Themes then chose you theme.
Here they are 6 finest empathy theme beside on my opinion :

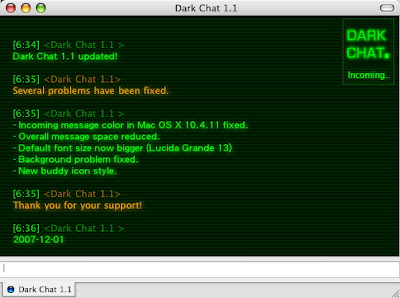
Dark Chat
empathy theme
Paraphernalia 
empathy theme 
iPhone Message Style

empathy theme
Cinematic
 
 Blackened
empathy theme
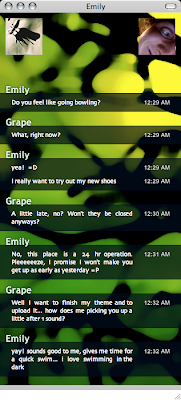
Grape's Glassy Style
empathy theme 
 eventually this is end of discuss, i hope will enjoy your chatting ..

0 comments

» read more....

Cool and Creative Laptop Cases Design

8:09 AM

Laptop has become primary needs for me and majority people now day, we play some game in a laptop, working with laptop, almost i write this words in my laptop. Yesterday while i surfing in internet, unintentionally i found beautifull laptop bags and cases design you can make or buy, check this out ..

My Documents Laptop Sleeve | $29.99
It’s rare to have a laptop inside My Document.
my  document 50+ Cool Laptop Sleeves and Bags You Can Actually Buy
Cassette Tape Tote Bag | $11.99
Isn’t exactly meant for laptop, but it would be cool to carry around.
Cassette Tape 50+ Cool Laptop Sleeves and Bags You Can Actually  Buy
Juicy Couture ‘Strawberry Fields’ Laptop Sleeve | $N/A
For those who love Juicy Couture, this is a must have.
juicy  50+ Cool Laptop Sleeves and Bags You Can Actually Buy
Kailo Chic | $29.99
7 laptop sleeves to add flair to your business wardrobe.
kailo  50+ Cool Laptop Sleeves and Bags You Can Actually Buy
Inter-departmental Mail Italian Leather Laptop Sleeve | $80.00
Just don’t send it away like your usual mail.
Kena  Kai  50+ Cool Laptop Sleeves and Bags You Can Actually Buy
Velvetidole | €69.00 – €145.00
High quality leather calf laptop bags.
velvet 50+ Cool Laptop Sleeves and Bags You Can Actually Buy
Fabrix Laptop Sleeves | $35.00 – $50.00
Our fav on the store is black angus, but there’s another 11 more. Available in different sizes.
fabrix 50+ Cool Laptop Sleeves and Bags You Can Actually Buy
Red Maloo laptop Sleeve | $130.00
Utmost unique laptop sleeve. Comes in 4 different colors.
red  maloo 50+ Cool Laptop Sleeves and Bags You Can Actually Buy
Built NY 15-inch Laptop Sleeve | $14.99
Felling retro, anyone?
Built NY 15 inch Laptop Sleeve 50+ Cool Laptop Sleeves and Bags You  Can Actually Buy
Casauri Laptop Brief | €49.90
Funky design laptop case. Fits up to a 15 incher.
Casauri 50+ Cool Laptop Sleeves and Bags You Can Actually Buy
AppleSac The Original | $29.99
This stylish and functional sleeve is made from burlap and 100% polyester sherpa fleece. Click here to see more.
applesac 50+ Cool Laptop Sleeves and Bags You Can Actually Buy
AppleSac Red Delicious | $29.99
The Red Delicious is lined with thick brown 100% polyester sherpa fleece that will soundly protect your MacBook.
red  delicious 50+ Cool Laptop Sleeves and Bags You Can Actually Buy
Proporta Protective Laptop Sleeve | €19.95
The Protective Laptop Sleeve 13" provides essential protection against scratches and impact damage, whilst storing your laptop safely away when not in use.
Protective Laptop Sleeve 50+ Cool Laptop Sleeves and Bags You Can  Actually Buy
Reversible Anti-Shock Sleeve Case | $12.95
Reversible Purple and Black colored stylish laptop sleeve. Excellent for any occasion, whether you are at working, in school or traveling.
Reversible 50+ Cool Laptop Sleeves and Bags You Can Actually Buy
Easy Laptop Sleeve | €59.00
Simple hard graft design at it’s core – premium asphalt dyed 100% wool felt perfectly harmonizes the cognac leather tab and the feature red/white ribbon.
easy  laptop sleeve  50+ Cool Laptop Sleeves and Bags You Can Actually Buy
2UNFOLD Multi-use Leather Laptop Bag | €349.00
This bag is something of a sartorial transformer, the 2UNFOLD offers eight different ways for you to sport it:
2UNFOLD 50+ Cool Laptop Sleeves and Bags You Can Actually Buy
Foof Macbook Sleeves | $25
Foof has great range of beautiful laptop sleeves, and here are two we really like.
foofshop 50+ Cool Laptop Sleeves and Bags You Can Actually Buy
ACME x Paul Smith Laptop Bag | $139.99
Laptop Sleeve Bag in Stripe print by Acme Made in collaboration with Paul Smith.
paulsmith 50+ Cool Laptop Sleeves and Bags You Can Actually Buy
Onyx Houndstooth | $49.00
Customizable to fit your laptop size.
Onyx  Houndstooth 50+ Cool Laptop Sleeves and Bags You Can Actually Buy
Denim Black Laptop Sleeve | $39.90
Inside each sleeve is a soft nylon loop that allows keyrings, carabineers and lanyards to be attached.
denim  50+ Cool Laptop Sleeves and Bags You Can Actually Buy
Sumo Camo Mini Laptop Sleeve | $17.99
Design to fit the 10 inchers.
sumo  50+ Cool Laptop Sleeves and Bags You Can Actually Buy
Bumper Laptop Sleeve | $29.99
Designed to take the hits for your laptop whether you’re traversing the urban jungle or doing battle on the road.
Bumper Laptop Sleeve 50+ Cool Laptop Sleeves and Bags You Can  Actually Buy
Cargo Laptop Sleeves | $40.00 – $50.00
Available in 3 different colors and sizes. It’s not only a laptop sleeve, it holds your other accessories like mouse, external HD and flash drives too.
cargo  50+ Cool Laptop Sleeves and Bags You Can Actually Buy
Belkin Quilted Carrying Case | $29.99
Come in blue, black and pink color.
Quilted Carrying Case 50+ Cool Laptop Sleeves and Bags You Can  Actually Buy
AirMail | $34.00
Perfect for Macbook Air.
airmail 50+ Cool Laptop Sleeves and Bags You Can Actually Buy
Vyper M3 | $49.95
Vyper M3 is a compact and durable sleeve with a slick, rugged exterior and a non-scratch interior designed to protect your laptop against scratches and excessive wear.
vyper  50+ Cool Laptop Sleeves and Bags You Can Actually Buy
Robot Laptop Sleeve | $40.00
Made of high quality vinyl and padded with 1/2 fabric backed foam.
Robot Laptop Sleeve 50+ Cool Laptop Sleeves and Bags You Can  Actually Buy
9-5 Laptop Sleeve | $40.00
A laptop sleeve that you can bring with you to corporate America.
9 5  Laptop Sleeve 50+ Cool Laptop Sleeves and Bags You Can Actually Buy
MacTruck | $249.95
Professional-grade, work-in enclosure – a whole new way to use and protect your notebook computer.
mactruck 50+ Cool Laptop Sleeves and Bags You Can Actually Buy
Laptop Backpack | $80.00
The Laptop Backpack has your back—and will keep your computer safe and secure.
laptop backpack 50+ Cool Laptop Sleeves and Bags You Can Actually  Buy
InCase Slim Sleeve | $34.95
Incase offers range of laptop sleeves and other product in various of colors, and what we showed you here is just one color of a particular sleeve.
ncase  50+ Cool Laptop Sleeves and Bags You Can Actually Buy
Posh Leopard | €24,99
With its golden inner lining this one is a symbol for the extraordinary and elegant.
posh  50+ Cool Laptop Sleeves and Bags You Can Actually Buy


0 comments

» read more....